How To Show Hibernate Statistics Via JMX In Spring Framework And Jetty Server
05-02-2015To monitor Hibernate statistics via JVM, we can use Spring JMX beans. The JMX support in Spring provides you with the features to easily and transparently integrate your Spring application into a JMX infrastructure.
Specifically, Spring’s JMX support provides four core features:
- The automatic registration of any Spring bean as a JMX MBean
- A flexible mechanism for controlling the management interface of your beans
- The declarative exposure of MBeans over remote, JSR-160 connectors
- The simple proxying of both local and remote MBean resources
Spring Bean Configuration
We should set hibernate.generate_statistics to true (either in persistence.xml or in hibernate.cfg.xml or in your session factory bean configuration). Then register this bean:
<bean id="hibernateStatisticsMBean" class="org.hibernate.jmx.StatisticsService">
    <property name="statisticsEnabled" value="true" />
    <property name="sessionFactory" ref="sessionFactory" />
</bean>
Note: After upgrading Hibernate 4, we cannot use default hibernate statistics. Therefore, you can use following class:
import org.hibernate.SessionFactory;
import org.hibernate.stat.Statistics;
import org.springframework.beans.factory.FactoryBean;

public class HibernateStatisticsFactoryBean implements FactoryBean<Statistics> {
    private SessionFactory sessionFactory;

    @Override
    public Statistics getObject() throws Exception {
        return sessionFactory.getStatistics();
    }

    @Override
    public Class<?> getObjectType() {
        return Statistics.class;
    }

    @Override
    public boolean isSingleton() {
        return true;
    }

    public void setSessionFactory(SessionFactory sessionFactory) {
        this.sessionFactory = sessionFactory;
    }
}
Reconfiguration:
<!--Hibernate Statistics JMX-->
<bean id="hibernateStatisticsMBean" class="HibernateStatisticsFactoryBean">
    <property name="sessionFactory" ref="sessionFactory" />
</bean>
Note: If you are not using JPA, just specify your sessionFactory bean instead of getting it through the EMF.
And finally we need an mbean server and exporter:
<bean id="mbeanServer" class="org.springframework.jmx.support.MBeanServerFactoryBean">
    <property name="locateExistingServerIfPossible" value="true" />
</bean>
<!-- Root Context: defines shared resources visible to all other web components-->
<bean id="jmxExporter"
      class="org.springframework.jmx.export.MBeanExporter">
    <property name="beans">
        <map>
            <entry key="Hibernate:type=statistics">
                <ref local="hibernateStatisticsMBean"/>
            </entry>
        </map>
    </property>
</bean>
org.springframework.jmx.export.MBeanExporter: JMX exporter that allows for exposing any Spring-managed bean to a JMX MBeanServer, without the need to define any JMX-specific information in the bean classes
org.hibernate.jmx.StatisticsService: JMX service for Hibernate statistics.
Configure Jetty Maven Plugin For JMX
<plugin>
    <groupId>org.mortbay.jetty</groupId>
    <artifactId>jetty-maven-plugin</artifactId>

    <configuration>
        <scanIntervalSeconds>1</scanIntervalSeconds>
        <connectors>
            <connector implementation="org.eclipse.jetty.server.nio.SelectChannelConnector">
                <port>9090</port>
                <maxIdleTime>60000</maxIdleTime>
            </connector>
        </connectors>
        <jettyXml>${basedir}/src/main/resources/jetty-jmx.xml</jettyXml>
        <stopKey>foo</stopKey>
        <stopPort>9999</stopPort>
    </configuration>
</plugin>
<jettyXml> element points to jetty jmx config file (jetty-jmx.xml):
<?xml version="1.0"?>
<!DOCTYPE Configure PUBLIC "-//Jetty//Configure//EN" "http://www.eclipse.org/jetty/configure.dtd">

<!-- ============================================================================ -->
<!-- To correctly start Jetty with JMX module enabled, this configuration         -->
<!-- file must appear first in the list of the configuration files.               -->
<!-- The simplest way to achieve this is to add etc/jetty-jmx.xml as the          -->
<!-- first file in configuration file list at the end of start.ini file.          -->
<!-- ============================================================================ -->
<Configure id="Server" class="org.eclipse.jetty.server.Server">

    <!-- =========================================================== -->
    <!-- Initialize an mbean server                                  -->
    <!-- =========================================================== -->
    <Call id="MBeanServer" class="java.lang.management.ManagementFactory"
          name="getPlatformMBeanServer" />

    <!-- =========================================================== -->
    <!-- Initialize the Jetty MBean container                        -->
    <!-- =========================================================== -->
    <New id="MBeanContainer" class="org.eclipse.jetty.jmx.MBeanContainer">
        <Arg>
            <Ref id="MBeanServer" />
        </Arg>
    </New>

    <!-- Add to the Server to listen for object events -->
    <Get id="Container" name="container">
        <Call name="addEventListener">
            <Arg>
                <Ref id="MBeanContainer" />
            </Arg>
        </Call>
    </Get>

    <!-- Add to the Server as a lifecycle -->
    <!-- Only do this if you know you will only have a single jetty server -->
    <Call name="addBean">
        <Arg>
            <Ref id="MBeanContainer" />
        </Arg>
    </Call>

    <!-- Add the static log -->
    <Get id="Logger" class="org.eclipse.jetty.util.log.Log" name="log" />
    <Ref id="MBeanContainer">
        <Call name="addBean">
            <Arg>
                <Ref id="Logger" />
            </Arg>
        </Call>
    </Ref>

    <!-- In order to connect to the JMX server remotely from a different
         process, possibly running on a different host, Jetty JMX module
         can create a remote JMX connector. It requires RMI registry to
         be started prior to creating the connector server because the
         JMX specification uses RMI to facilitate connections.
     -->

    <!-- Optionally start the RMI registry. Normally RMI registry runs on
         port 1099. The argument below can be changed in order to comply
         with the firewall requirements.
    -->
    <!--
    <Call name="createRegistry" class="java.rmi.registry.LocateRegistry">
      <Arg type="java.lang.Integer">1099</Arg>
      <Call name="sleep" class="java.lang.Thread">
         <Arg type="java.lang.Integer">1000</Arg>
      </Call>
    </Call>
    -->

    <!-- Optionally add a remote JMX connector. The parameters of the constructor
         below specify the JMX service URL, and the object name string for the
         connector server bean. The parameters of the JMXServiceURL constructor
         specify the protocol that clients will use to connect to the remote JMX
         connector (RMI), the hostname of the server (local hostname), port number
         (automatically assigned), and the URL path. Note that URL path contains
         the RMI registry hostname and port number, that may need to be modified
         in order to comply with the firewall requirements.
    -->

       <New id="ConnectorServer" class="org.eclipse.jetty.jmx.ConnectorServer">
        <Arg>
            <New class="javax.management.remote.JMXServiceURL">
                <Arg type="java.lang.String">rmi</Arg>
                <Arg type="java.lang.String" />
                <Arg type="java.lang.Integer"><SystemProperty name="jetty.jmxrmiport" default="1099"/></Arg>
                <Arg type="java.lang.String">/jndi/rmi://<SystemProperty name="jetty.jmxrmihost" default="localhost"/>:<SystemProperty name="jetty.jmxrmiport" default="1099"/>/jmxrmi</Arg>
            </New>
        </Arg>
        <Arg>org.eclipse.jetty.jmx:name=rmiconnectorserver</Arg>
        <Call name="start" />
    </New>
</Configure>
When we start the application, we can connect JMX server by typing localhost:1099 because default port is defined as 1099. Notice that 1099 port is used JMX, but our web application uses 9090 port which is defined in above Jetty maven plugin.
Start JConsole
After above configuration, we can now see Hibernate statistics. To start JConsole, run
jconsole.exe located in the Java JDK bin folder. 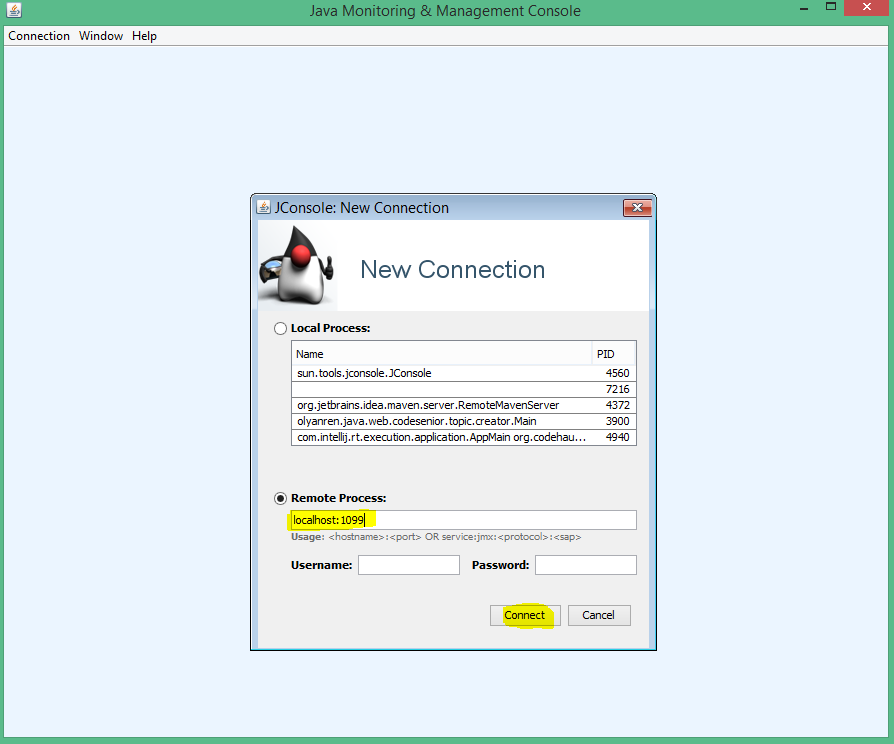
We choose Remote Process radio button, and typing localhost:1099 then click Connect button. After this you can see following screen:

Result
With Spring we can easily use JMX by defining necessary beans. For example, if we want to monitor log4j, we can use following bean:
 <bean id="jmxExporter"
          class="org.springframework.jmx.export.MBeanExporter">
        <property name="beans">
            <map>
                <entry key="myapp:type=logging,name=config">
                    <ref local="jmxLog4j"/>
                </entry>
            </map>
        </property>
    </bean>
<!-- Exposing Log4j over JMX -->
<bean name="jmxLog4j" class="org.apache.log4j.jmx.HierarchyDynamicMBean">
</bean>
